To examine rocks in more detail, geologists will make a microscope slide, or thin section, of their rock of interest. A thin section has a very thin slice of rock, usually about 0.03 mm thick, attached to a glass slide with an epoxy resin. Thin sections are usually about 26 x 46 mm, but there can be other sizes depending on what needs to be investigated. Making thin sections is a bit of a fine art, and involves preparing the glass slide and cutting and cleaning the rock to produce a “chip” (rectangular bit of rock about the same size as a glass slide). This chip is attached to the slide, and ground down to the correct thickness. It can be challenging to get an even thickness across the slide, as minerals all wear away at different rates and you can “lose” minerals during grinding. There’s some good info here about making thin sections.
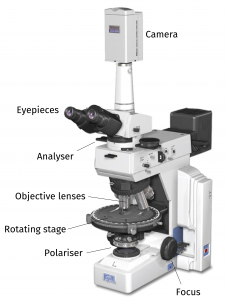
Most geological microscopes have a rotating stage, a polarising lens and an analyser. Geologists will work (most of the time) in what is called transmitted light, using plane polarised light (PPL) or cross polarised light (XPL).
When geologists use a microscope, they’re looking for several optical properties. These include basic properties such as the colour and shape of the different minerals, and others that need a bit more use of a microscope such as extinction (the angle at which a mineral goes black and you rotate the slide) and birefringence (the colour of the mineral using crossed polars).

By using a polarising film, the light then vibrates in a single plane – this is plane polarised light:

By using the analyser on the microscope, which is made of polarising film, we can look at additional properties such as extinction and birefringence in cross polarised light. You can try this at home if you find two pairs of polarising sunglasses – put the pairs together, at 90° to each other. No light should get in, and if you look through a lens, it will remain black (extinction). If you then rotate the glasses, light will come through, but will be in odd colours (birefringence).

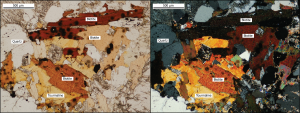
Minerals have different characteristics using the different types of light – plain polarised (PPL) and cross polarised (XPL) . As an example, in a Cornubian granite, the following minerals have the following basic properties:
| Mineral | PPL | XPL |
| Quartz | Dull! Colourless, rounded shape | Black to light grey, sometimes undulose |
| Alkali feldspar | Colourless, quite often looks “cloudy”, tabular rectangle shape | Crystals are often half grey and half black. |
| Plagioclase feldspar | Colourless, sometimes looks cloudy, tabular rectangle shape | Stripy like a zebra! |
| Biotite mica | Orange / brown, stands out, various shapes | Hint of bright blues & greens, masked by the brown |
| Muscovite mica | Colourless, striated | Beautiful blues, pinks and oranges, mottled if you turn the rotating stage |
| Tourmaline | Lovely oranges and blues in concentric circles | Hints of bright blues & greens, masked by the orange colour |
As a thin section is a small slice through a 3D object, a rock, the minerals can all be orientated in slightly different ways. Due to this, they have different colours and properties. Part of being able to understand optical properties is knowing about crystal structures and shapes to know what direction you are “looking through” the mineral under the microscope. In this example, you can see biotite is labelled 3 times – it has different colours and shapes, because the slide has been sliced through biotite in different orientations.
There are some really great resources on microscopy, a personal favourite is Alex Strekeisen’s website, which has images from many different rock types you can spend hours exploring.